How to convert olm to pst, Convert Outlook Mac 2011 to Outlook Windows pst on Windows PC?
Install OLM to PST Converter Pro
- To install OLM to PST Converter Pro on your computer system
- Download the latest software setup of OLM to PST Converter Pro
- Double-click on the installer file.
- Follow on-screen instructions to complete the setup.
Selecting OLM files to convert
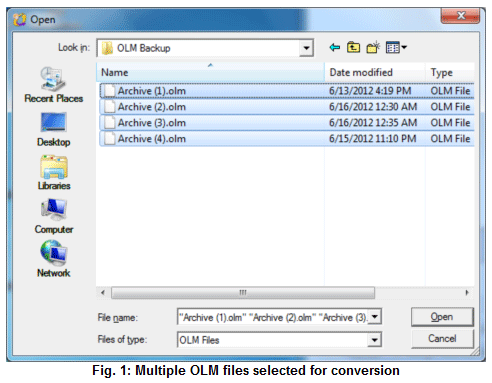
When you launch “OLM to PST Converter Pro”, a file open dialog box opens where you can select single or multiple olm files.
Once you open selected OLM file(s), following screen is displayed. Various parts of the screen have been highlighted by numbered boxes and description of each box is given below.
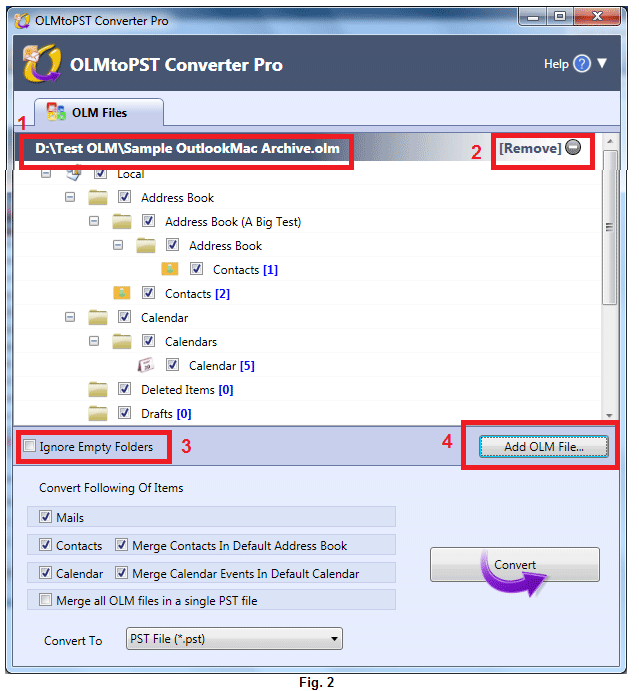
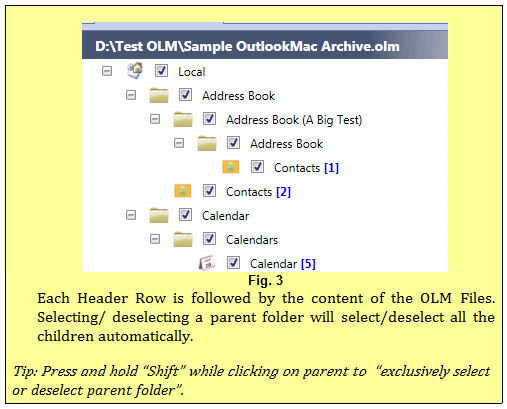
1. The Header Row (highlighted by box 1) in Folder view displays full path of OLM File as follows.
2. Removing a OLM file (highlighted by box 2): If you want to remove a certain OLM file from the view then click on the “Remove this OLM” button located on right side of the header row as shown in the following figure. A tooltip also appears to assist you.

3. Check the “Ignore Empty Folders” checkbox (highlighted by box 3) to exclude all empty folders from conversion. It also gives you a cleaner view to select items from.
4. Click “Add OLM Files…” (highlighted by box 4) button if you want to add more OLM files for conversion.
Working with Conversion Options
OLMtoPST Converter Pro provides following options to control the output of conversion.
1. Mails Section (highlighted by box 1)
1.1 Mails Checkbox: This checkbox reflects the selection state of “Mail” folders. It can be in one of the following states:
a. Unchecked:
![]()
If there is no folder selected in Folder View which hold Mail type of items, this checkbox is unchecked and vice versa.
b. Checked:
![]()
If all of the folders which hold mail items in Folder View are selected then this check box is checked and vice versa.
c. Intermediate:
![]()
If only some folder hold emails are selected, then this checkbox changes to intermediate state.
d. Disabled:
![]()
If this checkbox is disabled then it means that there is no folder available which has some Mail item to convert. For example, if you have added an OLM file for conversion but the file only holds “Contacts” and “Calendar Events”
2. Contacts Section (highlighted by box 2)
2.1. “Contacts” Checkbox: This checkbox reflects the selection of “Contact” folders. It can have following states:
a. Unchecked: If there is no folder selected in Folder View which hold contact type of items, this checkbox is unchecked and vice versa.
b. Checked: If all of the folders which hold contact items in Folder View are selected then this check box is checked and vice versa.
c. Intermediate State: If only few of the folders which hold contacts are selected, then this checkbox goes in intermediate state.
d. Disabled: If this check box is disabled then it means that there is no folder available which has some “Contact” item to convert. For example if you have added a OLM file for conversion but it holds only “Mails” and no “Contacts”.
2.2 “Merge Contacts in Default Address Book” checkbox:
An OLM file can have multiple address books (contact folders). Exporting such file will result in multiple “Contacts” folders created in similar folder hierarchy as they are in source OLM file. Usually each PST file has a default “Contacts” folder at root. So, check this option if you want to merge all your contacts in default “Contacts” folder. Otherwise uncheck this option.
This option is checked by default. Moreover this option is disabled if no contacts are selected for conversion.
3. Calendar Section (highlighted by box 3)
3.1. “Calendar” Checkbox: This checkbox reflects the selection of “Calendar” folders. It can have following states:
a. Unchecked: If there is no folder selected in “Folder View” which hold calendar type of items, this checkbox is unchecked and vice versa.
b. Checked: If all of the folders which hold calendar items in Folder View are selected then this check box is checked and vice versa.
c. Intermediate: If only few of the folders which hold calendar are selected, then this checkbox goes in intermediate state.
d. Disabled: If this check box is disabled then it means that there is no folder available which has some “Calendar” item to convert. For example if you have added an OLM file but it holds only “Mails” and no “Calendar”.
3.2. “Merge Calendar Events in default Calendar” checkbox:
An OLM file can have multiple calendar folders. Exporting such file will result in multiple “Calendar” folders created in similar folder hierarchy as they are in source OLM file. Usually each PST file has a default “Calendar” folder at root. So, check this option if you want to merge all your contacts in default “Calendar” folder. Otherwise uncheck this option.
This option is checked by default. Moreover this option is disabled if no calendar is selected for conversion.
4. “Merge all OLM files in a single PST file” checkbox:
You can add multiple OLM files for conversion. When you start conversion process, one new PST file is exported for each OLM file. This feature is helpful while processing multiple OLM files from different users. But if you want to merge everything in a single big PST file then you should check this option.
5. “Convert To” drop-down (highlighted by box 4): It displays the output format just for convention.
6. “Convert” Button (highlighted by box 5): Click this button after you are ready to export content from your OLM files.
Conversion Progress
When conversion process starts, “Conversion Control Options” slide out of view and “Conversion Progress” view slides in. Once the process starts, folder view is disabled to prevent any changes during conversion progress. Description of various highlighted boxes is given below.
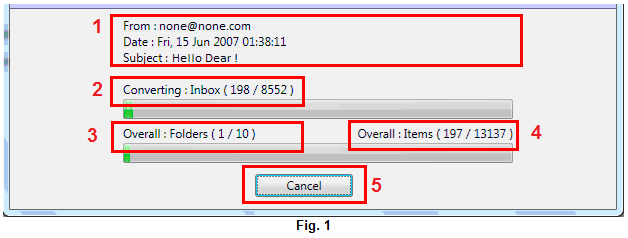
1) The application title bar displays percentage of overall progress completed at any moment. So you can minimize and continue with your work and at the same time monitor the progress of conversion process in task bar button.
2) Item Details (highlighted by box 1): It shows the details of current item being processed.
3) Progress of Current Folder being processed (highlighted by box 2): It shows the progress in terms of Items converted out of total number of items in current folder. As illustrated in fig. 1, “Inbox” is current folder being processed and 198th item is being converted out of total 8552 items from “Inbox”
4) Overall Folder Progress (highlighted by box 3): It shows overall progress of conversion process. As you can see in fig. 1, 1st folder is being processed out of total 10 folders
5) Overall Item Progress (highlighted by box 4): It shows the overall progress of conversion process. As you can see in Fig. 1, 197 items have been processed out of total 13137 items.
6) Cancel Button (highlighted by box 5): You can cancel the conversion process anytime by clicking “Cancel” button or pressing the “Esc” key.
Conversion Report
Once olm to pst conversion is complete, a conversion completion report slides into the view.
Conversion Report is saved in the output folder with name “Conversion Report Brief – ##” where ## represents the date-time when conversion was started. A detailed conversion report is also saved in output folder with name “Conversion Report Full – ##” which contains a list of all converted items.
1) Conversion Report Brief – ##: This report contains list of all the converted folders along with the number of items converted from each folder.
2) Conversion Report Full – ##: This report contains a full list of all the converted emails, contacts and calendar items.
Purchasing License & Unlocking the demo version
Click to Buy OLM to PST Converter Pro License key and follow the on-screen instructions to place your order. Once you successfully complete the order process, you will receive your personalized license key shortly at your registered e-mail id.
To unlock the full features of OLM to PST Converter Pro, click on the “Unlock” (unlock full version) button available at the top right-hand corner of the application window.

A registration window opens up. Enter your customer Id and License key provided to you in the mail and press “Unlock” button to enjoy full features of your OLM to PST Converter Pro.